For gym owners · Set-up guide

Set up your gym on FitStat, step by step

From the sign-up form to your first renewal reminder, with a screenshot of every screen. Most gyms are signed up in five minutes and running within a week of their 14-day free trial.

Online sign-up is paused for now, so our team does the first five steps with you: call or WhatsApp +91 9606603004. From step 6 on, this guide is exactly what you'll see in your gym app.

Stuck? Call or WhatsApp +91 9606635003 or write to hello@fitstat.in (Monday to Saturday, 9 AM to 7 PM IST).

Sign-up checklist

Get these ready before you talk to us

Tick each item as you have it. Your ticks are kept on this device only, so you can come back later.

To sign up (5 minutes)
For your first week in the gym app
To switch on the automation (optional)

Set up with our team

Online sign-up is paused for now. Call or WhatsApp +91 9606603004, or write to hello@fitstat.in, and we'll set your gym up with you.

Sign up

Step 1 · fitstat.in/for-gyms

Gather what you need

Open the FitStat for gyms page and go through the sign-up checklist. Tick what you have; your ticks are saved on your device. Fill in the Your details box to carry your gym's name, email and mobile into the form.
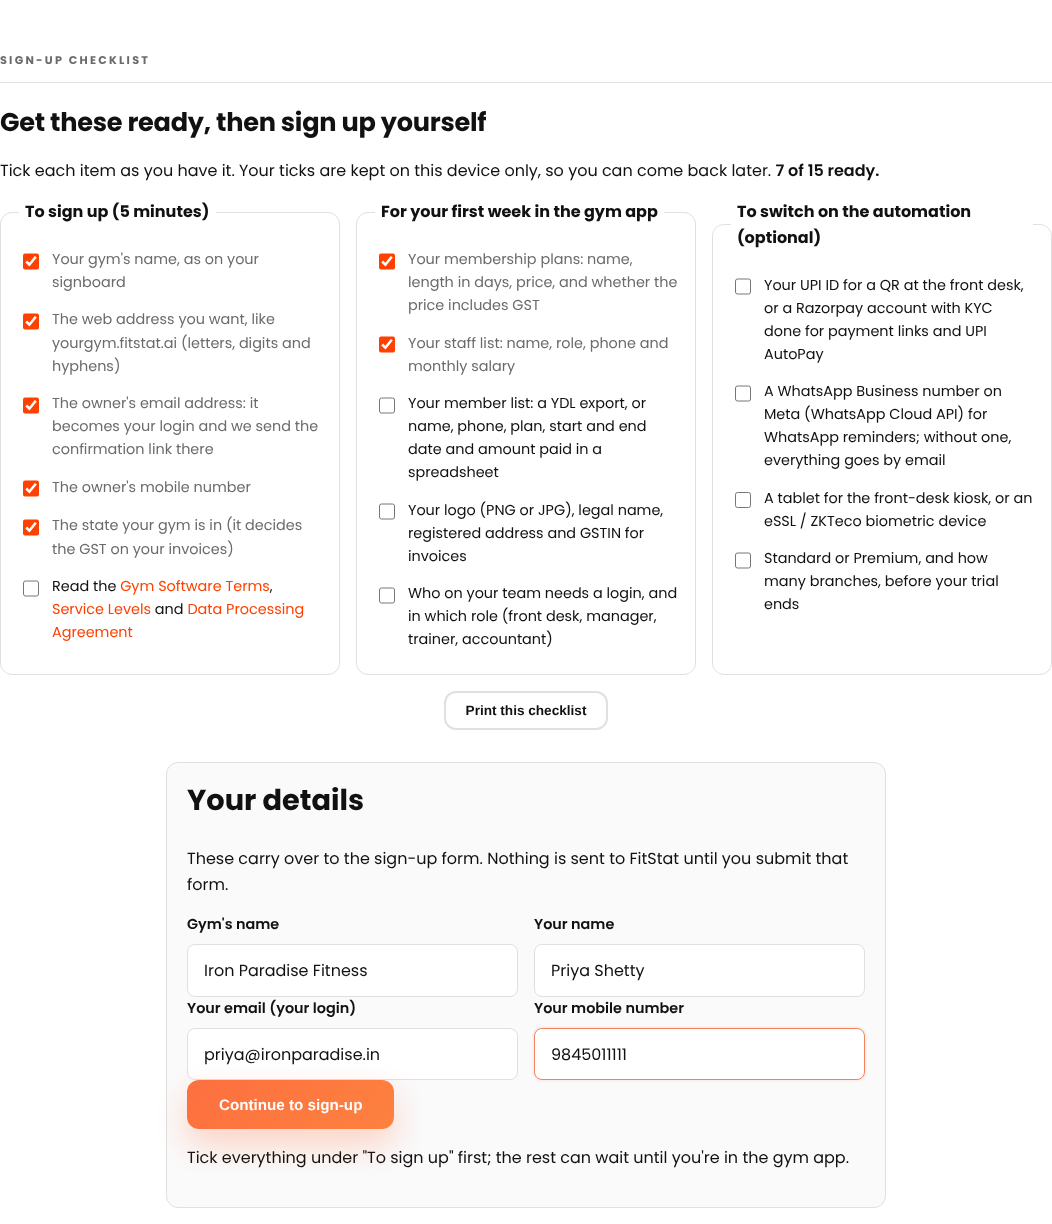
Screenshot: Gather what you need

Step 2 · fitstat.in/for-gyms/signup

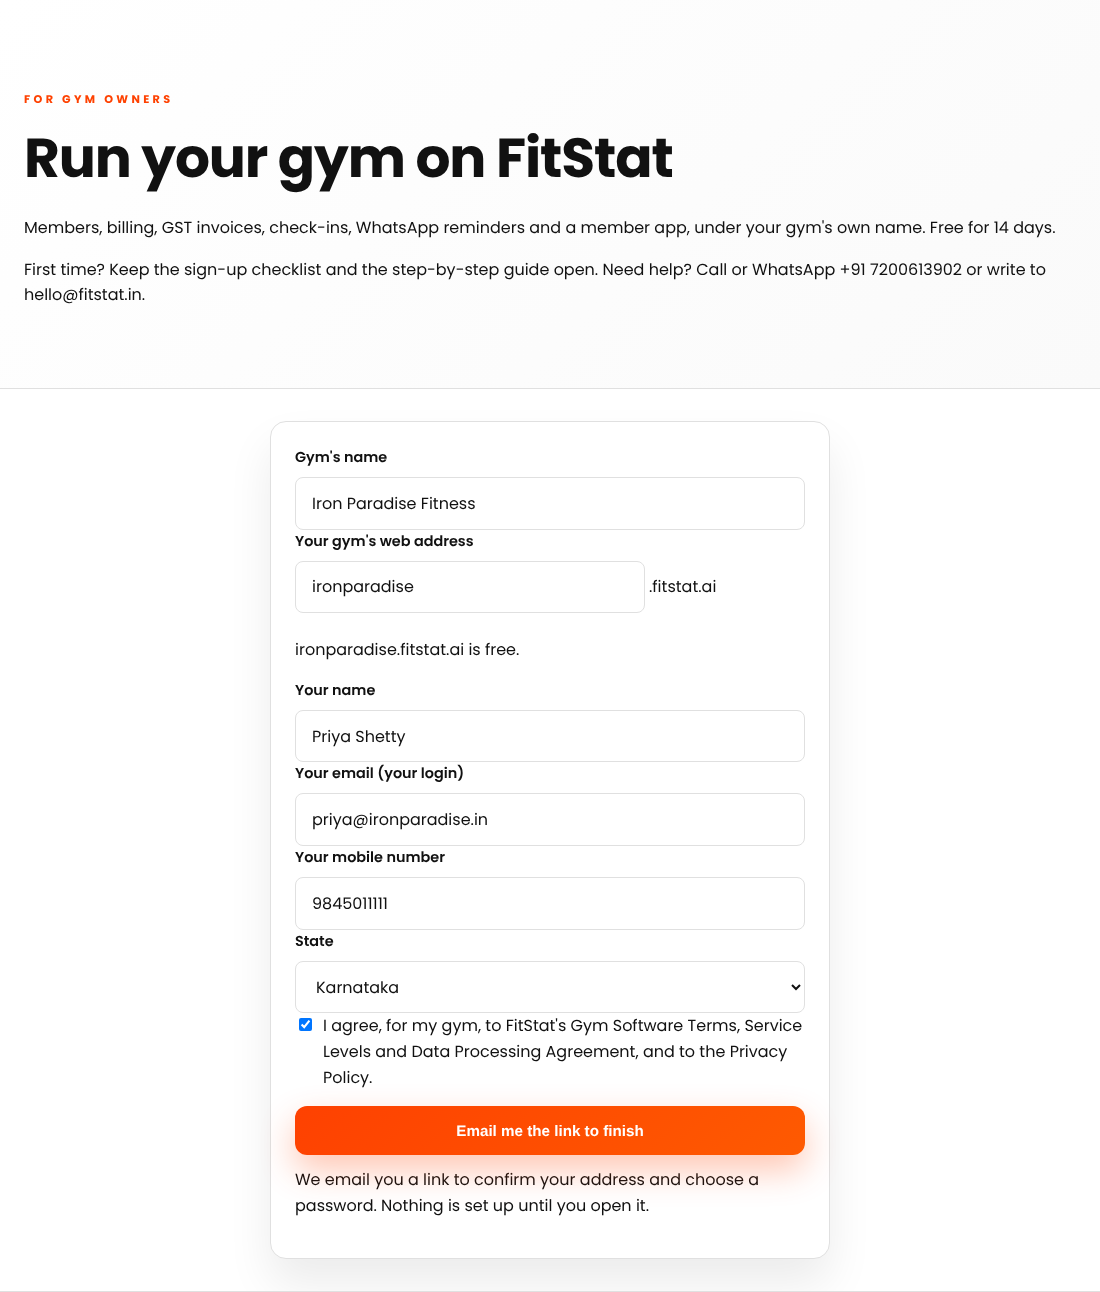
Fill in the sign-up form

Enter your gym's name and pick its web address: we suggest one from the name and tell you at once if it's free. Add your name, the email you'll sign in with, your mobile and your state, accept the terms and press Email me the link to finish.

  • Use an email you can open now: the link is sent there.
  • The web address can't be changed later, so choose a short one your members will recognise.
Screenshot: Fill in the sign-up form

Step 3 · Your inbox

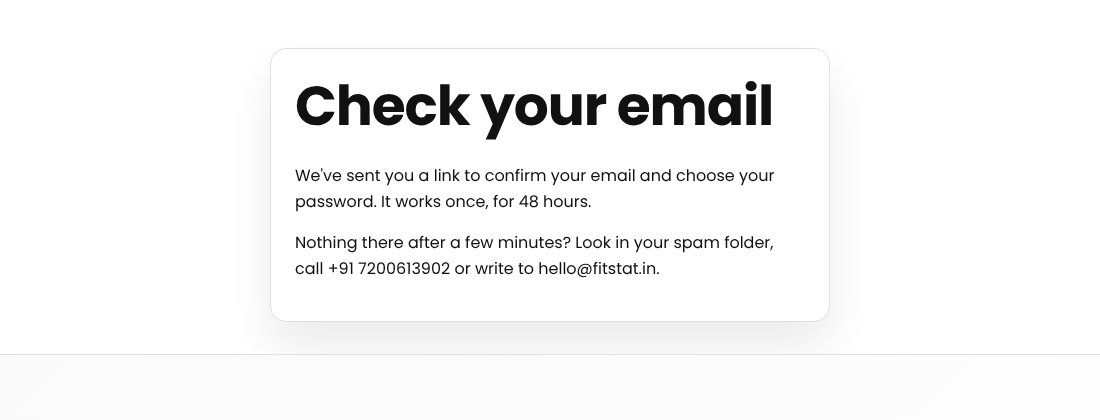
Check your email

We send you a link straight away. It works once, for 48 hours. Nothing is created until you open it.

  • Nothing after a few minutes? Look in spam, or call us.
Screenshot: Check your email

Step 4 · The link in the email

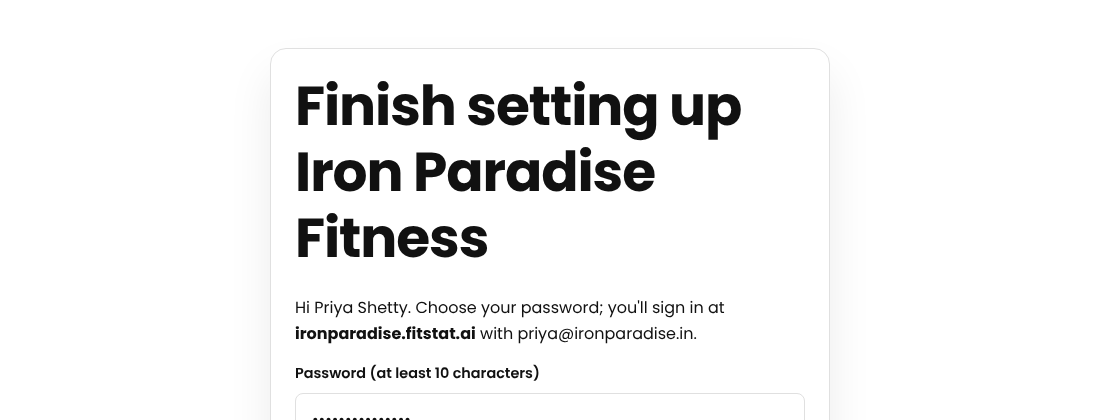
Choose your password

Open the link, choose a password of at least 10 characters and press Create my gym.

Screenshot: Choose your password

Step 5 · fitstat.in

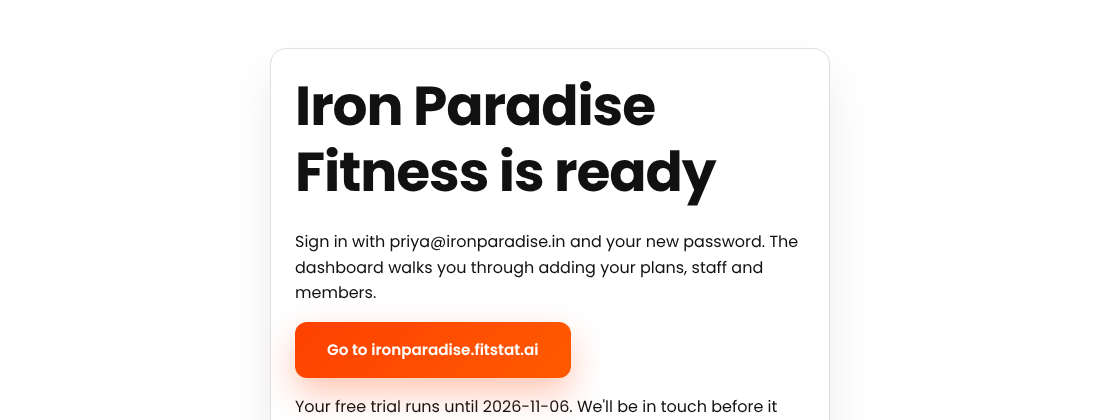
Your gym is ready

Your gym app is live at your own web address and your 14-day trial has started. Press the button to go to it.

Screenshot: Your gym is ready

Set up your gym

Step 6 · yourgym.fitstat.ai/login

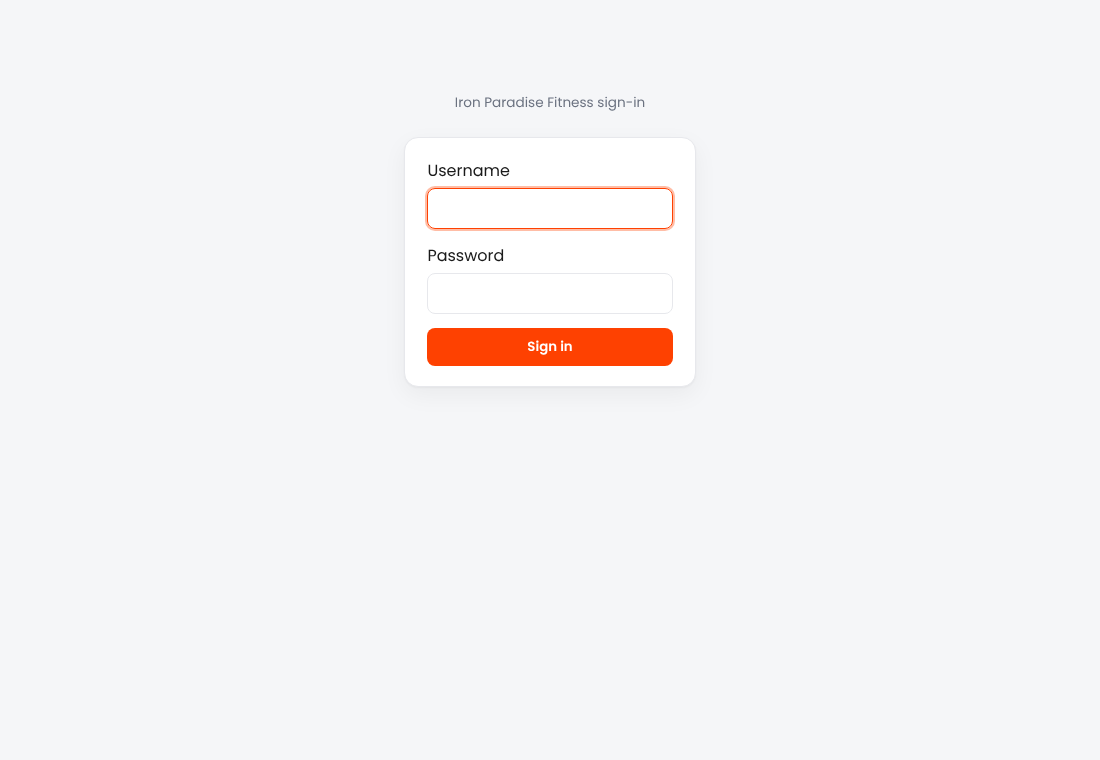
Sign in to your gym app

Sign in with your email and password. Bookmark this address; your staff sign in here too.

Screenshot: Sign in to your gym app

Step 7 · Dashboard

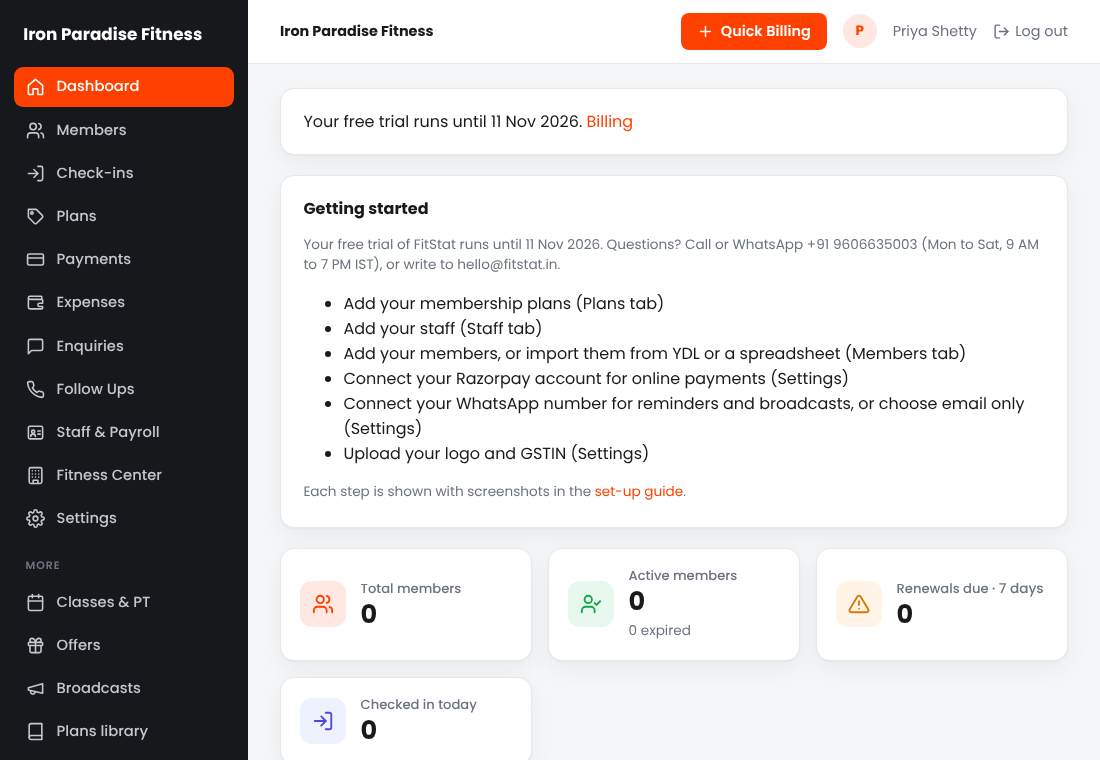
Follow the Getting started card

The Dashboard lists the six things to set up. Each one is ticked off as you do it, and the card goes away when all are done.

Screenshot: Follow the Getting started card

Step 8 · Plans (left menu)

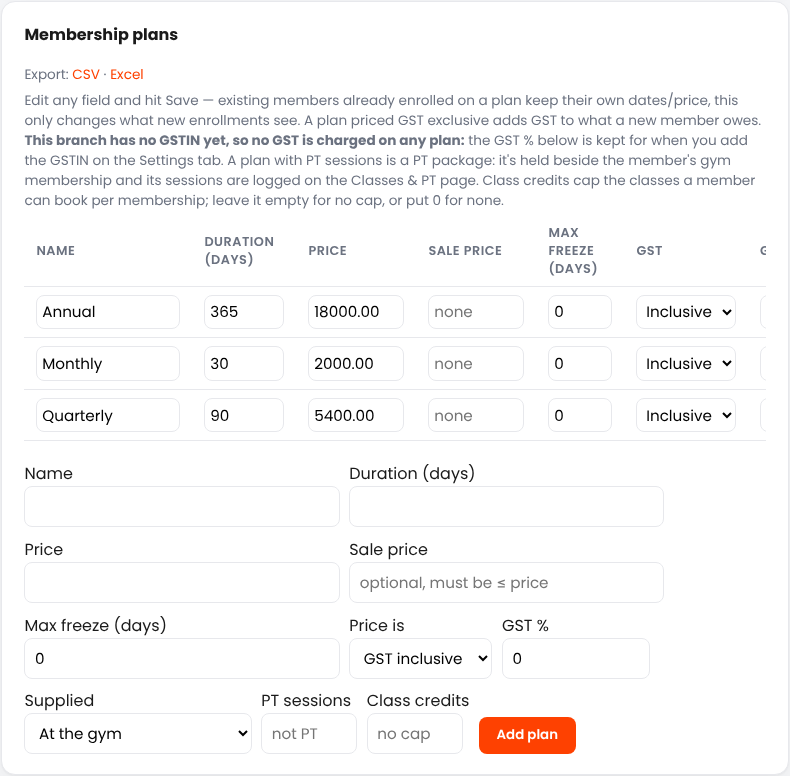
Add your membership plans

Add each plan with its length in days and price. Say whether the price includes GST and the GST rate; add a sale price, freeze days, PT sessions or class credits where they apply.

Screenshot: Add your membership plans

Step 9 · Staff & Payroll (left menu)

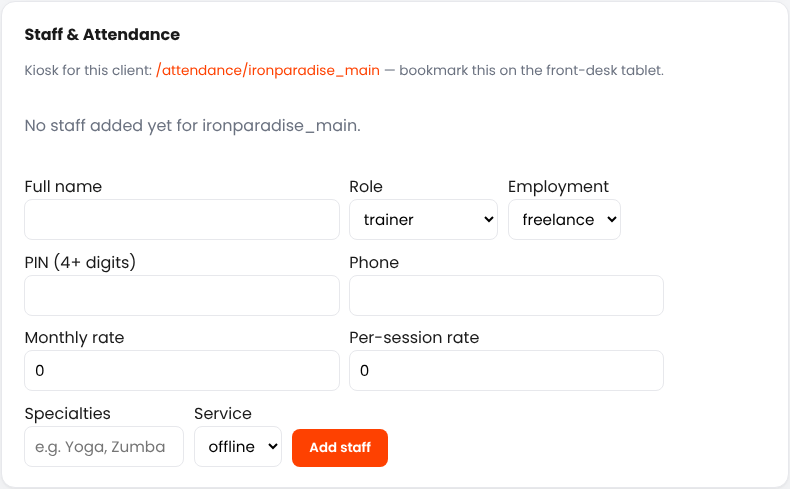
Add your staff

Add trainers and front-desk staff with their role, phone and monthly or per-session rate, and a PIN of 4 or more digits they use to mark attendance at the front-desk tablet. Payroll then runs from here.

Screenshot: Add your staff

Step 10 · Members (left menu) → Import members

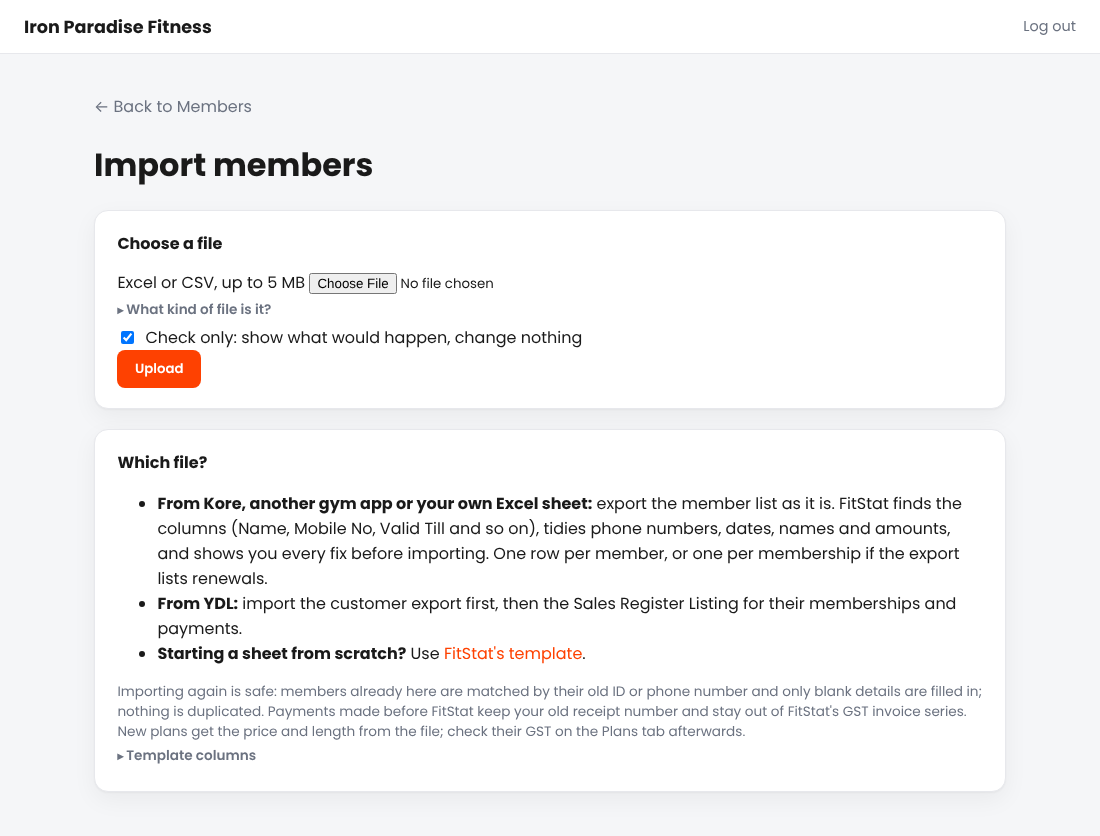
Import your members

Upload the member list from Kore, another gym app or your own Excel sheet as it is: FitStat finds the columns, tidies phone numbers, dates, names and amounts, and shows you every fix. From YDL, upload the customer export first, then the Sales Register Listing. Starting from scratch? Fill in our template. Check only is ticked the first time, so you see what would happen without changing anything. Untick it and upload again to import.

  • Running the same file again doesn't create duplicates.
  • Old payments keep their old receipt numbers and stay out of your GST invoice series.
Screenshot: Import your members

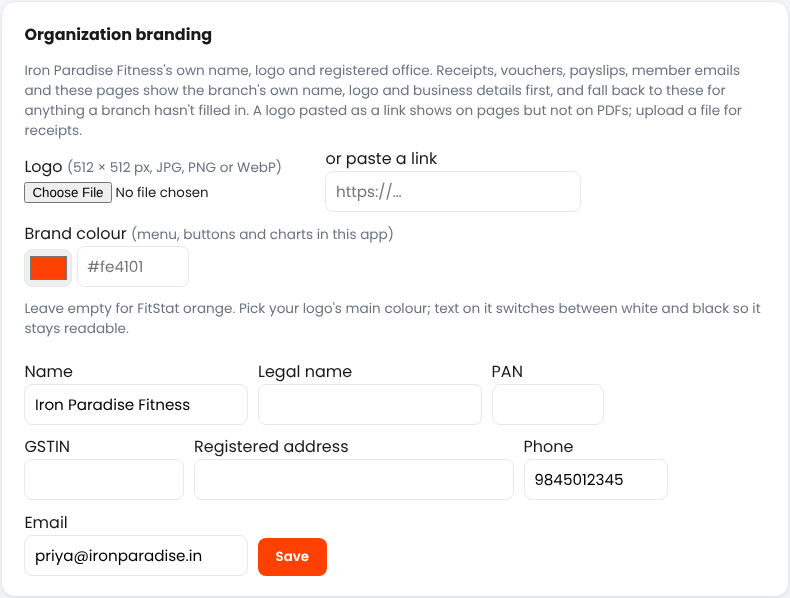
Step 11 · Settings (left menu) → Organization branding

Add your business details and logo

Under Organization branding, upload your logo and fill in your legal name, registered address, PAN and GSTIN. They appear on every invoice, receipt and email. Pick a brand colour too, and your gym app, sign-in page and kiosks use it in place of FitStat orange. Business details, higher up on Settings, sets the branch's own address and invoice code.

Screenshot: Add your business details and logo

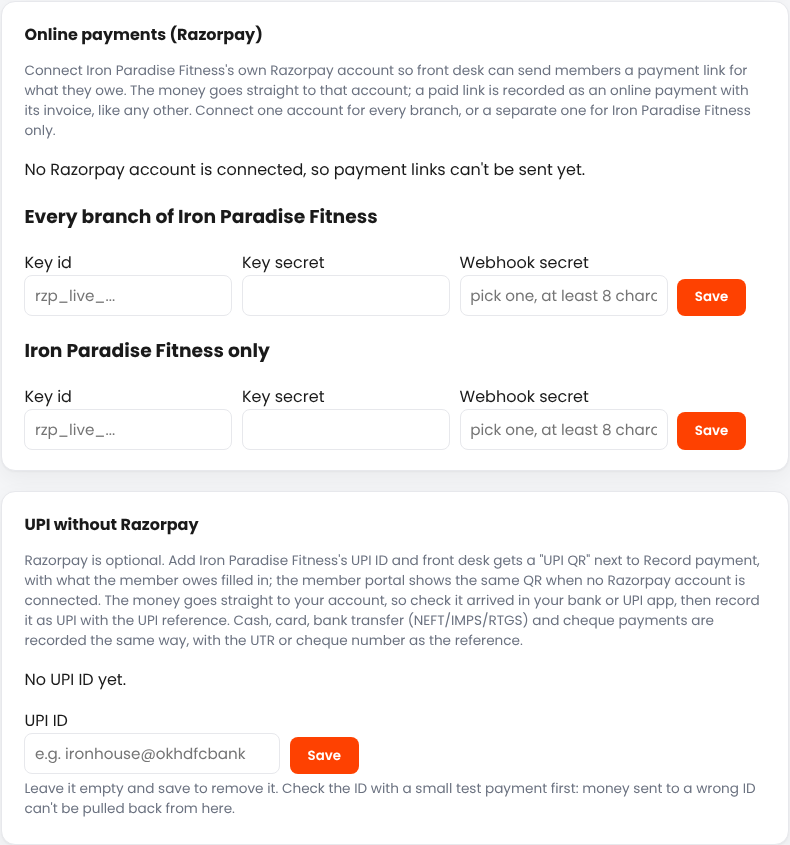
Step 12 · Settings (left menu) → Online payments (Razorpay), UPI without Razorpay

Choose how members pay

Razorpay is optional. Add your UPI ID and front desk gets a UPI QR with the amount filled in. Cash, card, UPI, bank transfer (NEFT/IMPS/RTGS) and cheque are recorded with their reference. To send payment links and take UPI AutoPay, paste the key id and key secret from your Razorpay dashboard and choose a webhook secret: members then pay into your own account and are marked paid on their own.

  • Check a new UPI ID with a small test payment first.
Screenshot: Choose how members pay

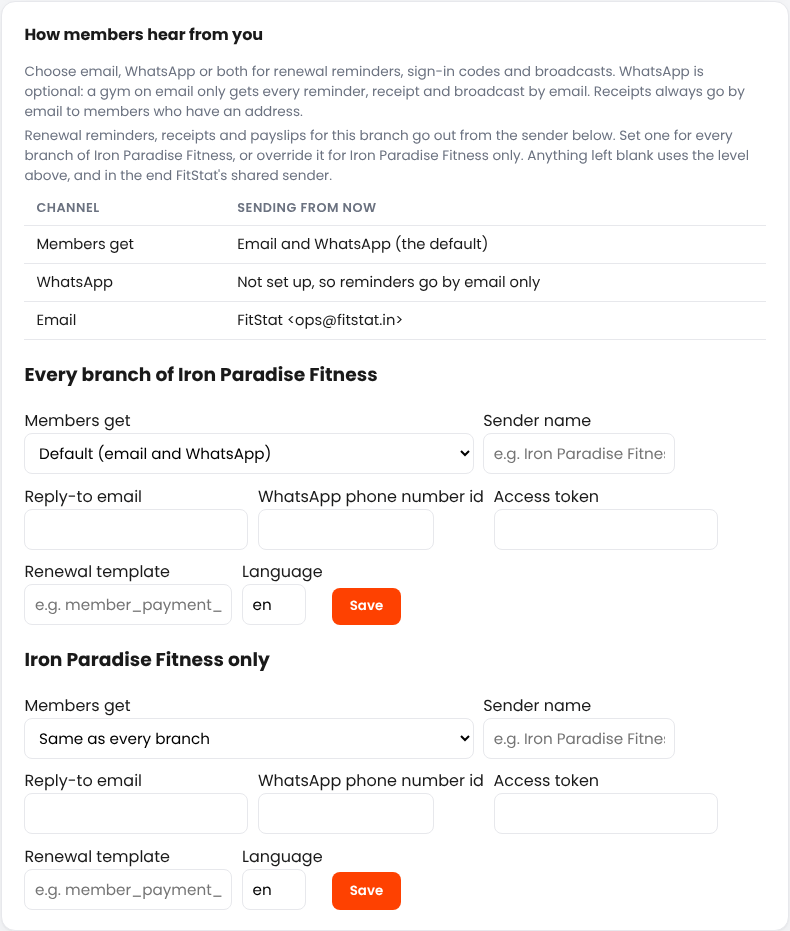
Step 13 · Settings (left menu) → How members hear from you

Choose how members hear from you

Pick email, WhatsApp or both for renewal reminders, sign-in codes and broadcasts. WhatsApp is optional: on email only, every reminder, receipt and broadcast goes by email. Add a sender name and reply-to email so emails come from your gym. To use WhatsApp, enter your WhatsApp Business phone number id, access token and approved renewal template.

Screenshot: Choose how members hear from you

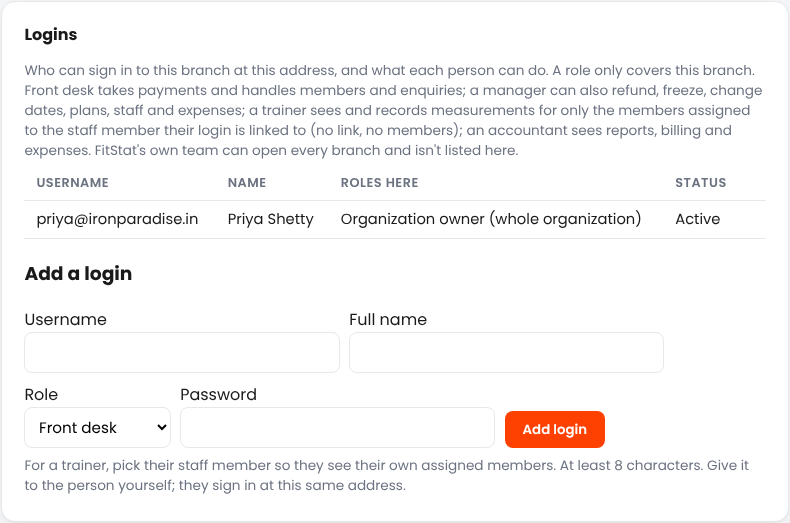
Step 14 · Settings (left menu) → Logins

Give your team their logins

Add a login for each person with the role they need: front desk, manager, trainer or accountant. Each role only sees what it should.

Screenshot: Give your team their logins

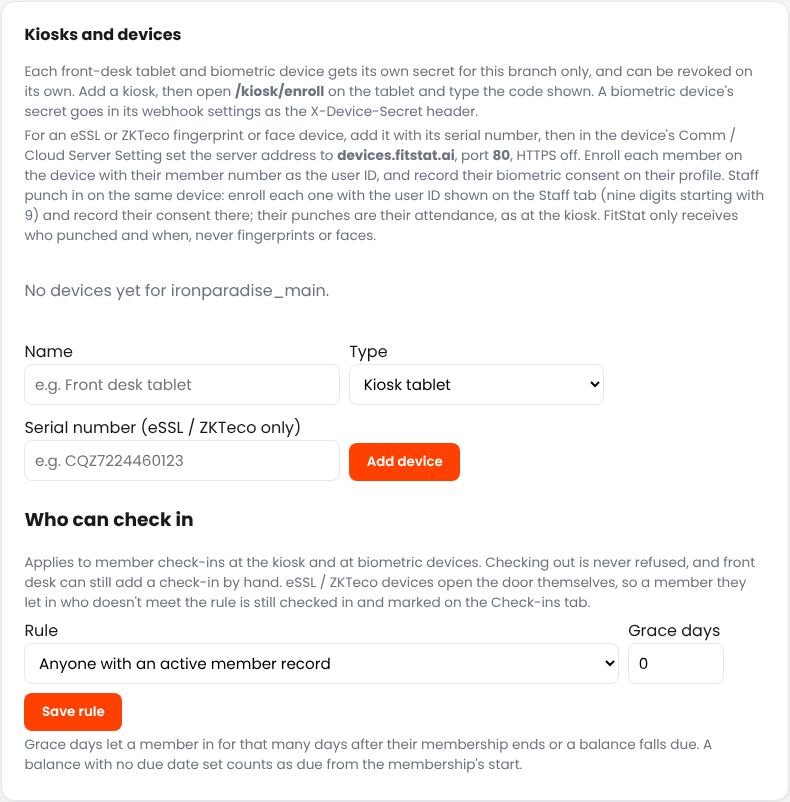
Step 15 · Settings (left menu) → Kiosks and devices

Set up check-in

Add a kiosk tablet or your eSSL / ZKTeco device and choose who may check in. Or print the check-in QR code for the front desk.

Screenshot: Set up check-in

Before your trial ends

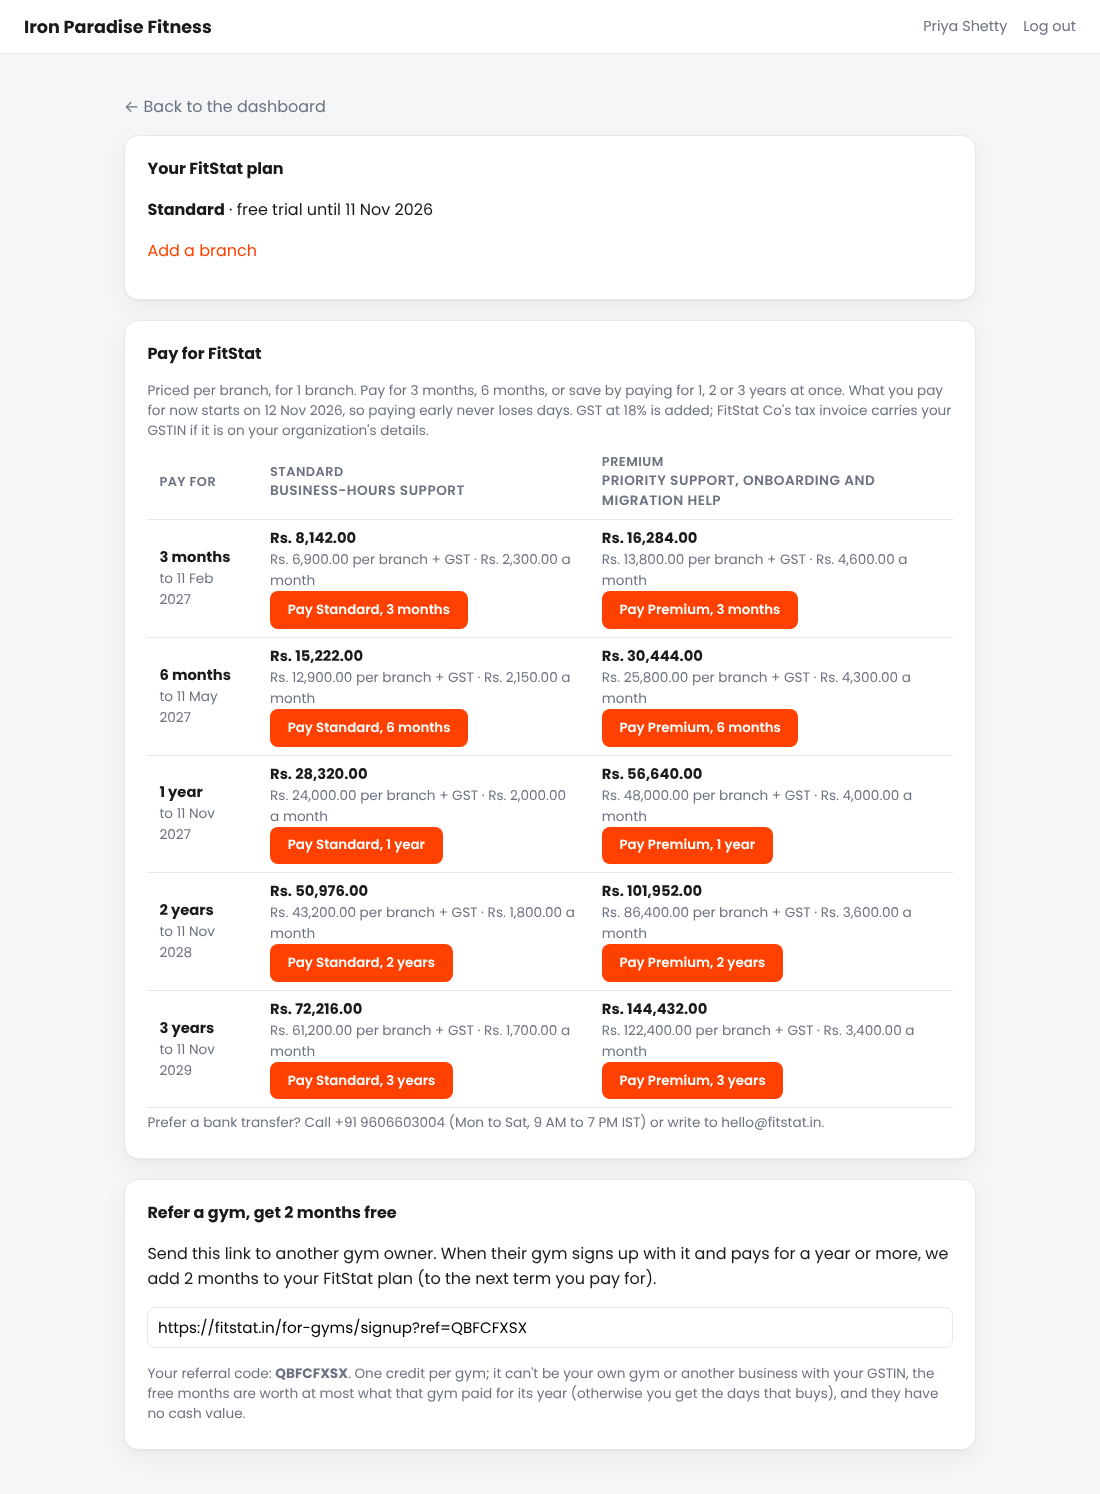
Step 16 · Billing (link in the free-trial note on the Dashboard)

Choose your plan and pay

Pick Standard or Premium and pay online for 3 months, 6 months, or 1, 2 or 3 years; longer terms cost less a month. What you pay for starts the day after your trial ends, so paying early loses nothing. FitStat emails you a GST invoice.

  • Refer another gym with the link at the bottom of this page: when it pays for a year or more, you get 2 months free.
Screenshot: Choose your plan and pay

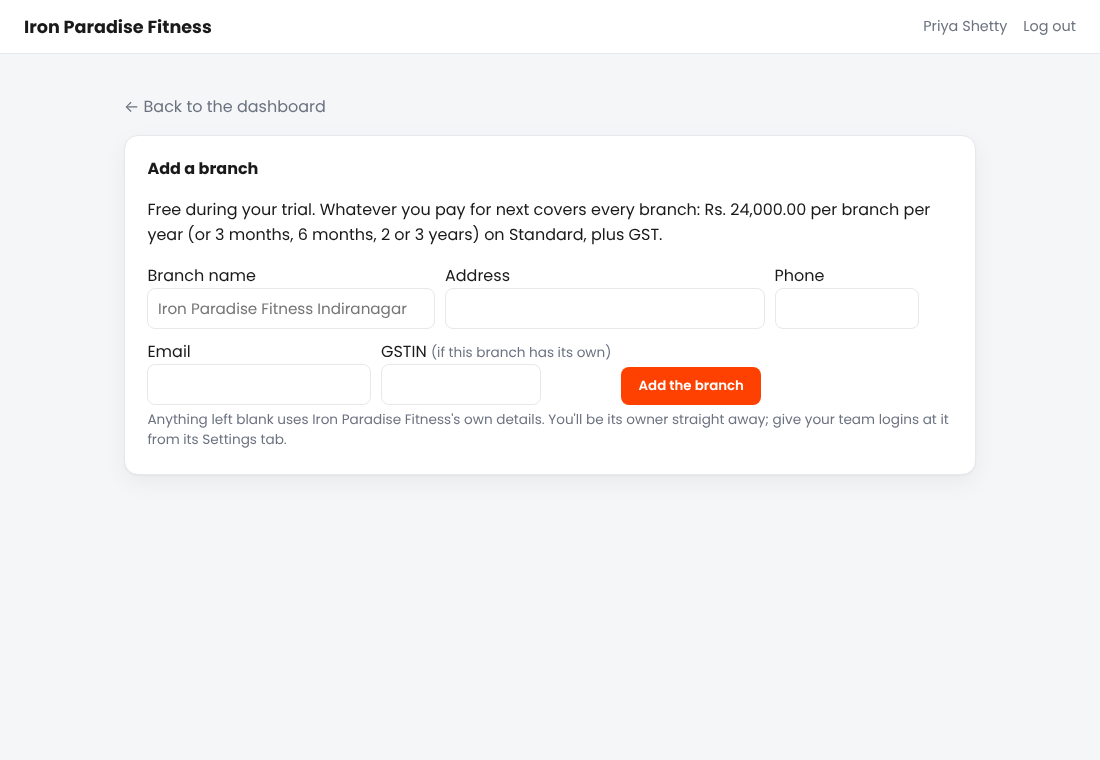
Step 17 · Add a branch (left menu, under More)

Opening another branch?

Add it from the left menu. During the trial it's free; in a paid term you pay only for the days left.

Screenshot: Opening another branch?

Need a hand?

Standard includes one guided set-up session with us; on Premium a named manager does the set-up and migration with you. Call or WhatsApp +91 9606635003 or write to hello@fitstat.in.

Screens shown are from a demo gym and may differ slightly from yours as FitStat improves.